How to Build a Stunning Portfolio Website with Squarespace: A Step-by-Step Guide

Creating a portfolio website is one of the first steps to a rewarding career in your chosen field. Whether you are a student, job seeker, freelancer, or a creative professional, a stunning website reflects who you are and what you do. With a few clever strategies, you can even use this website to connect with audiences and get the dream job or project you want.
That said, building a website can be overwhelming, especially if you’re busy with another career or have never done it before. That’s where website builders like Squarespace help. With a wide range of beautiful templates and a simple user interface, Squarespace can help you create impressive portfolio websites quickly. The best part is no coding knowledge is required to create these websites.
Now that you know what Squarespace can do, let’s see how to leverage its features to create your portfolio website. Plus, we’ll share expert tips to make you stand out from the crowd.
Here are the steps to build a portfolio website on Squarespace.
Table of Contents

Step 1: Start With a Plan
As a first step, decide why you want to create a website and what you want to achieve through it. For some, it can be a way to showcase their portfolio, connect with new audiences, and get more work or contractors. A few others may offer an online store for their work or even as a marketing platform to grow their customer base. Depending on your goal, you can use Squarespace’s features and templates.
Step 2: Create a Website Structure
Depending on your objective, create a website structure for your portfolio website. A well-defined structure provides a logical flow to your visitors and allows you to say much about your work in a way that people can relate to.
Though you can create a structure that best aligns with your preferences, here are a few essential pages that we see across all portfolio sites.

Homepage
This is the first page that visitors see when they visit your website. Make this page attractive and welcoming to entice visitors to linger around and see your other pages.
Tips
Here are some tips to create a welcoming homepage.
- Start with a clear headline to give a precise idea of what they can get from this website. Use action verbs that resonate with your audience. For example, instead of saying “I’m a designer”, say “I create designs that align with your brand values.” Such emphatic words reflect your confidence and show users what they can get from you.
- Add a CTA in the part of the page that they can see without scrolling.
- Include social proof like testimonials, client logos, and anything else that will build credibility.
- Since the homepage reflects you, add something personal like a welcome video, behind-the-scenes photo, or personal mission statement.
About Us/Me
This is the page where you tell the world who you are and why you are in this space. Most people don’t have time for long bios, so keep it short and relevant.
Tips
- Add a professional photo of yourself.
- Use first-person words to make it personal.
- People love stories, so make sure you tell yours.
- Use numbers or statistics to make your achievements more tangible.
- Show how you add value to your audience.
Portfolio
This is the heart of your website and use this page to show your best work. Make it as intuitive as possible to capture viewers’ attention.
Tips
- Use high-quality images.
- Organize your work across different categories.
- Provide a brief description of each work.
- Focus on how your work helped clients.
Contact Page
Contact pages are another staple as they allow users to get in touch with you. Offer multiple ways through which a user can contact you like email, phone number, physical visit, and more. Most modern pages have a contact form as well.
Tips
- If you have a physical office, add a map to help people find you. This also adds credibility.
- Restrict the fields on a contact form to the name, email address, phone number, and message.
- Add links to your social media profiles.
Besides these pages, you can also add other pages like Testimonials, Blogs, Resources, etc.
Step 3: Sign Up For a Squarespace Account
Once you finalize the website structure, sign up for a Squarespace account. Note that you can get a free trial and no credit card is required for it.
The process to sign up is as follows.
- Visit the Squarespace site.
- Click a button called “Get Started” on the homepage.

3. In the next screen, pick what your website is all about. You can choose from the list option or search for your site topic and select it.
4. Next, you will be prompted to select the purpose of your website. In this case, select the Squarespace portfolio website option. Using this option, Squarespace will list the relevant templates. You can also choose to skip this step completely.
5. In the next step, you will be asked to choose from the existing designer templates or use a tool called Blueprint AI to build a custom site that’s guided by AI.
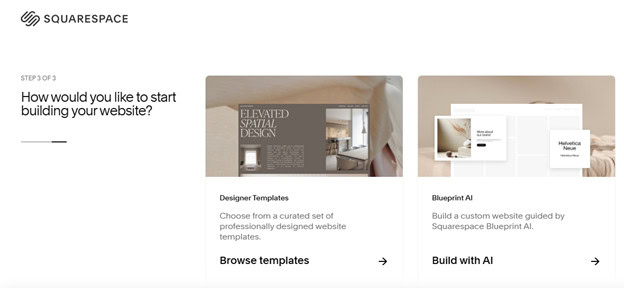
6. In this guide, we will focus on building a portfolio site from an existing template, and hence, we are going with the first option. If you want to create something from scratch, go for the Blueprint AI option. Note that you can also switch over at any time.
7. Next, Squarespace will display a set of templates that match your industry and purpose, and you can select one from those options. You can always change the template later.
8. After you select a template and are ready to customize it, Squarespace will ask for your personal details like your first name, last name, email address, and password. You can also use your Google account to sign up. Enter the details and click the “Create Account” option.
9. Check your email for a verification email. Note that it may come from no-reply@squarespace.com. Keep an eye on your spam folder if you don’t get an email within a few minutes.
10. Click the link on the email to verify your email address.
With this, you have created an account on Squarespace. Next, log into your account to build a portfolio site.
Step 4: Select a Template and Customize It
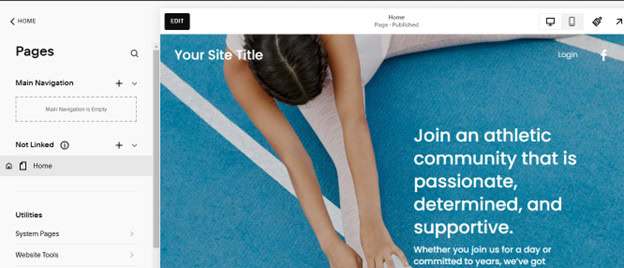
Once you’re all set up on Squarespace, select a template that looks good to you and start customizing it.
After you select a template, it will open in your workspace editor. Below are your customization options.
Site Styles
As a first step, access the paintbrush in the top right-hand corner. This opens the Site Styles panel, and this is where you can adjust colors, fonts, and other design elements that fit well with your brand.

Once you’re done, click Exit to go back to the main editor.
Headers
Next, you can edit the header area to add a custom logo or change the site title.
Pro tip: If you don’t have a logo, you can use Squarespace to create a custom one.
You can also add other elements like buttons, social links, a cart, account/login options, and languages on the header.

Once done, save your changes and exit.
Main Menu
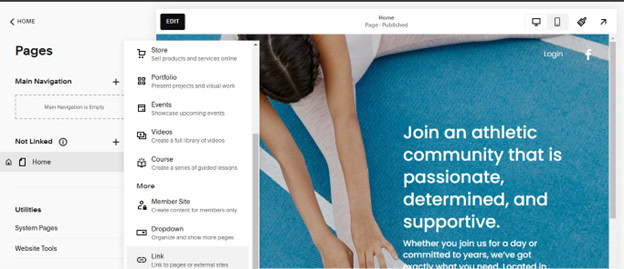
Go to the Pages section on the dashboard and reorder the pages to meet your preferences. You can also add or hide pages from public view.
Edit Page Elements
Now that you have the main structure set, visit each page to add elements and customize it how you want. You can use the “+” button to add elements to your page. Choose from Squarespace’s built-in elements like text blocks, images, galleries, etc to make your pages stand out.
A highlight of Squarespace is the granular control you have over every element. After you add a design element to your page, simply hover over that element to edit it. You can also add custom images, and optimize the title and Alt Text fields of images for better SEO.
You can also add background images and patterns for better visual appeal. Additionally, experiment with different block layouts like Collage and Overlap. Work around these multiple options until you have what you want.
As you can see, Squarespace makes it easy to customize a portfolio website without any prior coding knowledge. Its user-friendly interface and wide design options can make every site unique.
Step 5: Upload your Content
Once the design is ready, add the relevant content. The easiest way is to edit the page and add the text.
Squarespace also makes it easy to add images, videos, and text files in its content library for easy access. The steps for adding files are:
- Open the Pages option from the left-hand menu.
- Under the “Not Linked” section, click the “+” button, and select Link from the menu.
- This opens the Link editor. From the Link dropdown menu, select “File”

- Upload the file from your device.
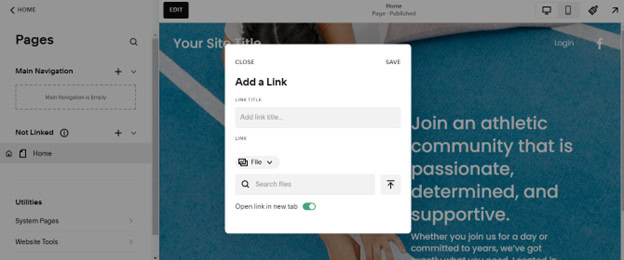
- Save your changes and add an optional title to make it recognizable.
Step 6: Make Your Site Mobile-responsive
It is estimated that 63% of Internet traffic comes from smartphones and tablets, and this means, your Squarespace portfolio website must be mobile-friendly.
Step 7: Optimize for SEO
To make your pages searchable and accessible to potential visitors, you must include SEO options, so they can appear on search engines.
Below are some ways to optimize your pages for SEO.
- User keyword tools to identify the relevant keywords. Research to know what keywords are your competitors ranking for, and include them in your site as well.
- Create clean URLs that include the primary keyword.
- Add a meta title and description to each page. Make sure they contain the relevant keywords.
- Add keywords to image titles and alt texts.
- Check for broken links.
- Link internally across pages, and also include a few external links to sites with high domain authority.
- Use analytical measures to measure performance and optimize accordingly.
Step 8: Preview and Publish
Now that you have the website ready, preview your pages, ensure everything is aligned, and check if all links are working. Once you’re satisfied, follow the below steps to publish your page.
Select a Plan
To publish your page, you must go for a paid plan. Choose from four options:
- Personal
- Business
- Commerce (Basic)
- Commerce (Advanced)

Connect your Domain
If you have a custom domain, connect it to your Squarespace portfolio website. To do this,
- Go to your Squarespace dashboard and click Domains.
- Click the “Use a domain I own” or “Connect to a third-party domain” option.
- In the Enter domain field, type the full URL of your domain.
- Click the Connect Domain button.
- Next, choose your Domain Provider from the drop-down menu. If your provider is not listed, click “Other.”
- Click Continue.
- Next, a DNS Settings panel will open. Check if the A Records points to Squarespace’s IP address. Otherwise, you will have to access the DNS records of your domain provider and modify them.
- Finally, click Connect and test your connection.
Note that these steps may require professional help, especially if you’re not familiar with DNS settings.
Change Site Accessibility
You must set the site access to the public. To do this,
- Go to the Settings menu on your dashboard.
- Click Site Availability.
- Choose the Public option to ensure everyone on the Internet can view your site.
- Save changes.
Once you have these settings changed, click Publish to make your site live. Check if the site is just the way you want. You can always go back to the editor to make changes, but make sure to publish your site after making every change.
With this, your Squarespace portfolio website is ready.
Final Thoughts
Overall, a portfolio website can provide a window into your work, provided it is appealing and well-structured. Squarespace makes it easy to build a portfolio website through its beautiful templates and extensive customization options. Additionally, we hope the portfolio website tips in this article help you create a website that is not only stunning but also rewarding.